12 de febrero de 2013

Android 4.2.2 JDQ39 Might be Rolling Out to GSM Galaxy Nexus, Nexus 7 and 10


NEXUS 10 44.2.2

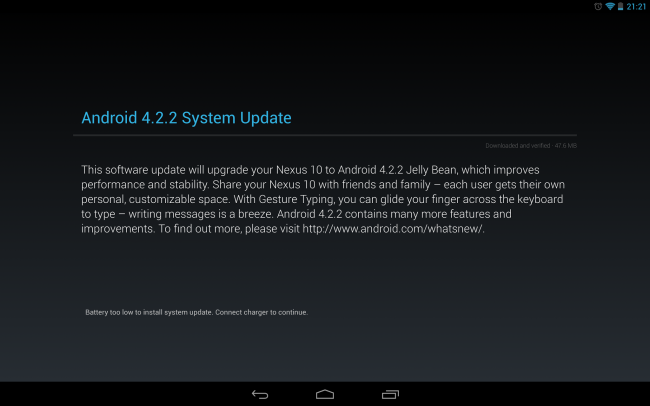
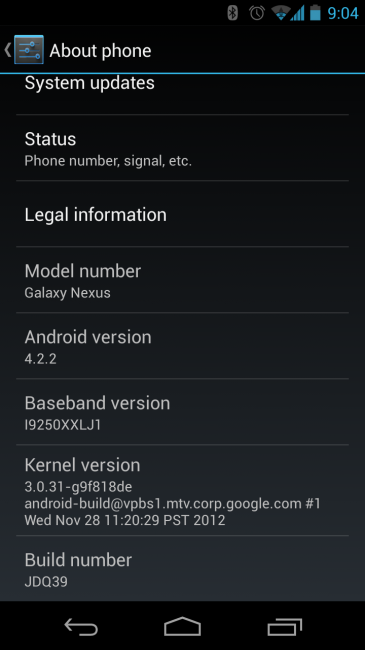
A couple of reports over at reddit and XDA this evening point to a rollout of a new update to the GSM Galaxy Nexus, Nexus 7, and Nexus 10. The update, as one would expect, is Android 4.2.2. We have seen this build a couple of times now, though we had no idea when to expect it. That time could be now.
The reports aren’t all that clear as to what may be included. Some think that Bluetooth streaming could be slightly improved, however, some of the earlier updatees have mentioned that it’s not perfect. Other than that, we won’t know for sure until it hits our own devices.

We have checked multiple Nexus 7s, a Nexus 10, a couple of GSM Galaxy Nexus phones, and my Nexus 4 and have come up empty. If you see it, be sure to let us know. Don’t forget to try to grab the link to the update file as well.

Nexus 10 About screen after the update:

NEXUS 10 4.2.2

GSM Galaxy Nexus About screen after the update:

GSM NEXUS 4.2.2


Via:  reddit | XDA [2] | Android Police
from Droid Life: A Motorola Droid Blog 

11 de febrero de 2013

El documental de The Pirate Bay disponible para ser visualizado

El documental de The Pirate Bay disponible para ser visualizado:
El pasado viernes se estrenó en el Festival Internacional de Cine de Berlín, conocido como Bernilale, el documental de The Pirate Bay Away From Keyboard, abreviado como TPB AFK. Nada lejos de lo normal si no fuera porque la película se distribuye gratuitamente por toda la red con licencia Creative Commons.

El documental de The Pirate Bay es el trabajo final después de que el director Simon Klose haya pasado 4 años con los fundadores de la polémica página de torrents. El proyecto ha sido financiado a través de Kickstarter. En realidad, sorprende por no querer llevarse ningún beneficio directo tal y como hacen el resto de películas. De hecho, han seguido su filosofía de compartir libremente las obras para que todo el mundo pueda disfrutarlas.
Este documental cuenta la historia de The Pirate Bay desde su nacimiento hasta hoy día pasando por todas las etapas turbulentas que ha tenido que superar mostrando la vida de los tres fundadores: Peter Sunde, Fredrik Neij y Gottfired Svartholm.
Según palabras del propio Simon Klose, está tremendamente satisfecho por el trabajo que ha elaborado. Además, cuenta que no se trata solo de un documental sobre los fundadores de The Pirate Bay, sino que también se centra en los usuarios de la página. Cabe destacar que incentiva a la gente a convertir la película a todos los formatos posibles y a compartirla con toda la gente que podamos.

Por otra parte, todos aquellos que quieran donar dinero al proyecto lo pueden hacer comprando el DVD por $23 dólares o simplemente pagando $10 dólares por la versión digital lista para descargar.
Ahora mismo, el vídeo oficial en YouTube ya cuenta con más de 800.000 vistas, sin contar con todas las otras versiones que otros usuarios han subido a la plataforma añadiendo subtítulos. Si la conexión nos va lenta, quizás sea mejor descargar el torrent en alta calidad.
Finalmente, creo que se trata de una buena acción para dar buena publicidad a la página además de darla a conocer. Distribuir una película de forma gratuita es algo que muy pocos pueden llegar a realizar.


from Gizmología 

Increase Your WiFi Speed With WiFi Explorer

Hey,
The world is going wireless, WiFi specifically. With speeds approaching that most wired networks (in access of 100Mps +), it is a good alternative to having to lay a wire around your house. The problem with WiFi is that your neighbour and other wireless devices can interfere with the network, leaving your with low speeds. If you leave in a crowded community of WiFi networks that much interference and cross talking can slow your speeds down. This post is going to show you how to get the most of your network and let you understand how WiFi networks operate.

Viewing The WiFi Networks

You can view the networks in your area with the menubar option, however I am going to show you, and use, a more advance little program called WiFi Explorer. It visually shows you how every WiFi network interacts. Its only a cheap program, which I recommend you purchase if you want to view more about your WiFi network.
When you open the program, let it run for a couple of minutes. It will record and measure the WiFi networks in the area. When it is ready you will see over lapping bands of networks. Each of these represents a channel which your WiFi network can reside on. Since your network cannot run on one specific frequency it will overlap and expand into the neighbouring frequency. As you can see in the image below, each network operates on a peak and spreads out.
There are many WiFi networks that overlap
In my local area, there isn’t that many networks. However, you can image in a crowded area there can be hundreds of networks, all operating on the same channels. Its like a shouting match, you need to shout the loudest to get the most network throughput, in the end every one gets drowned out. In my area, there is many channels all operating around channel eleven.
Having the strongest signal will mean your data will get through.
Being on a unique channel is on thing, the other is signal strength. With the signal strength viewer you can see which network is the strongest. If your network is in the middle or towards the bottom of the list, you may want a stronger router, or placed in a position that can emit a better signal. For instance, having the router in the basement is probably not the best place, in a room where you work is probably more efficient.

Increasing WiFi Strength and Speed

To increase your WiFi strength and speed we need to adjust the settings. This is usually done in your router, modem or WiFi emitter. The first step is to place the router in a position where the signal strength is the best. Mine runs at about 75%, its network “SHIELD Secret Base”. This is probably the best I can get, considering my router is 5 foot away. If you router is in the low twenties try moving it, or yourself, into a better position and see what signal strength you get. The stronger the signal strength the more speed you are likely to get.
The next stage is to change the channel in which your network operates on. In the first image, there are lots of networks operating on the 11th channel, although they have a low strength they may still interfere. This means everything is operating on the same frequency. In this example I would suggest changing the channel to something like channel  9 or 14. Most routers do auto cycling to find the best channel. If you don’t turn your router off periodically, or many networks have joined. It may have become crowded. In this example I would not recommend using channel 5, although I may have the most signal strength, there will be two networks in close proximity with strong networks.

2.4Ghz or 5Ghz

WiFi originally started at the 2.4Ghz spectrum, however as WiFi become more popular a need for a higher frequency is needed.  Using the 5Ghz spectrum this also allowed higher speeds to be found. Using WiFi Explorer I can see that there is no one using the 5Ghz, spectrum band. Using my router settings I can change the frequency to 5Ghz. There are less people using the 5Ghz band, as it is newer and people have not changed over, especially those networks set up by ISP’s. If you see in the 2.4Ghz band there are many users, and crowded channels, it is certainly worth changing to this higher frequency and there is more channels to choose from. If you have an option in your router to use higher channel numbers, in the hundred range, use them as these are rarely used. Most devices, certainly Apple ones, can use these spectrums.
Crowded 2.4Ghz channels? Use the 5Ghz spectrum.
The 5Ghz band is completely clear where I live. I am the only one using it. So if I am loosing anything on speed, there probably nothing I can do about it.

Conclusion

WiFi Explorer is a great little app. It allows you to see how the space around you is being used. With simple changes, such as using the least used channel, or by changing to a higher frequency you will be able to get a better speed and connectivity out of your WiFi connection.


from Mac Tricks And Tips 

Remotely access your Linux PC using LinuxBlueControl


Remote access is something a lot of smartphone owners get smartphones for, but folks on Linux haven’t been blessed with nearly as many options as those of us on Mac or PC. Those folks might be interested in a new app that has hit the Google Play Store recently. LinuxBlueControl will allow you to access your Linux installation’s file system to perform several tasks.


You can use a remote mouse, access images, files, and music playlists, control VLC media playback, transfer stuff via Bluetooth and more. Like any application of the sort, LBC requires a desktop server app alongside the Android app. Both are free to download, with the Android side of the equation being available in both the Google Play Store or as a side-loaded APK.

You may need to take care of a few dependencies so don’t forget to check out the installation instructions and FAQ document at this link. Otherwise, it seems like a fairly straight forward installation process so give it a shot and let us know if it treats you well in the comments section below.


from Android Phone Fans 

HOWTO: Test Drive Chrome OS Features The Chromium Way With VirtualBox


Acer Chromebook

We’ve had a lot of Chrome OS coverage the past week from supposed new Chromebooks, code interpretations, upcoming Chrome OS features, and of course a whole lot of speculation. Have you found yourself itching to give Chrome OS a try since you’ve seen extensive Chrome OS coverage this past week? While we can’t test drive any rumored hardware, we can test drive many of the newly reported features with just a little bit of work thanks to Chromium OS.

Chromium OS is the open source development version of Google’s Chrome OS. And thanks to Liam McLoughlin (aka Hexxeh) you can download nightly builds. Liam calls these “Vanilla builds”, which are  are bleeding edge, unstable development builds. They allow you to test drive the latest and greatest that Chromium OS has to offer. All you need to get started is a 4GB USB stick, VM Player, or VirtualBox.

The easiest way to get started is to use a USB thumb drive that’s at minimum 4GB. You’ll want to then head on over to Hexxeh’s website and download the latest nightly build for USB thumb drive installation. For Windows, you’ll w ant to use Windows Image Writer, then select the IMG file and select the USB device from the menu. Ubuntu Linux users can also install and use a similar utility called USB Image Writer, which can be installed from the Software Center.

Install Chrome with USB Image Writer

After your Chromium OS image file has been written to your USB drive, all you have to do is reboot your computer and boot to the USB drive. If your computer isn’t configured to boot to a USB device, you’ll want to either configure the options by entering the BIOS Setup or depending on your computer, you can hit an F-key upon start-up to choose a boot device. That’s it. You’re now booting a Chromium OS nightly build. Don’t worry, this won’t hurt your existing Operating System installation.

Not everyone has a USB thumb drive handy or one that is at least 4GB in size. No worries, as I said earlier, Liam, has us covered by providing both VMware and VirtualBox images. To get started with VirtualBox, Windows users will want to download and install the application from their website while Ubuntu users are safe to install VirtualBox via the Software Center. So, go ahead and install VirtualBox. Then, download the Chromium OS VirtualBox nightly build. Next, extract the VDI file somewhere on your computer.

Go ahead and launch VirtualBox and proceed to create a new VM (virtual machine). Feel free to choose any name you like.

CreateVM

Depending on how much memory your computer has available, you’ll want to be careful on this next step. I’d recommend using at least 1GB of RAM (1024 MB). If you can spare the extra memory, go ahead and bump the RAM up to 2GB (2048 MB). If’ve ran Chromium OS successfully with both 1GB and 2GB of RAM allocated.

ChromeOSRAM

Next, you’ll want to use an existing Virtual Hard Drive. Then, hit the browse button and select the Chrome OS VDI file that you downloaded and extracted earlier.

ExistingDisk

You can now finish the wizard by hitting Next and Finish. If you want to, you can configured additional options by selecting your newly created VM and clicking the ‘Settings’ gear icon. Under settings, select System. Depending on your computer system, you can bump up the processor from 1 CPU to 2 CPUs. I’ve ran Chromium OS successfully with 1 CPU. If you want a little more power, and your system can handle it, go ahead and bump the Processor’s up to 2.

ChromeOSCPU

Now, back on the main VirtualBox Manager screen, you’re ready to finally launch Chromium OS. Go ahead and start your VM by clicking the green ‘Start’ arrow icon. A new window will appear and boot up in a few seconds. To begin to use your VM, you’ll need to click inside the newly launched window. This will allow your Chromium OS virtual machine to capture your keyboard and mouse input.

ChromeOSVMSetup

To get back to your main computer desktop, in VirtualBox, you’ll want to hit the Right Ctrl button. This will release your keyboard and mouse and allow you to move your mouse outside of the virtual machine window. If you’re using VM Player, you’ll want to hit Ctrl and Alt.

If you have problems using your mouse while inside Chromium OS, you’ll want to disable Mouse Integration. You do this by right clicking on the mouse icon in the bottom right corner of your VirtualBox window (to the left of the down arrow beside Right Ctrl).

mousebutton

Once you have your keyboard and mouse settings all setup and working, you can begin setting up Chromium OS. Log in with your Google account credentials, to get started. If you use Google Chrome, your settings will begin syncing, such as your extensions and applications.

Setup Chromium OS with VirtualBox

If you want to enable some of the new features of Chromium OS, you’ll want to launch a browser window and type  chrome://flags in the omnibar. For example, to enable Rich Notifications, you’ll need to scroll the entire way to the bottom and click the Enable link. You’ll need to restart after any changes have been made. The fun is just beginning. There’s dozen and dozens of flags to check out. Some recently added ones to check out: Force high DPI mode and

  • Screen Capture Support.
Chrome Flags for added functionality

Additional features and new flags appear all the time. A good source for all things Chrome OS is François Beaufort on Google+. If you Circle him, he’ll let you know the moment a new, cool feature pops up in the latest development build.

If new features appear and you want to try them out, all you have to do is revisit Liam’s website, download the latest nightly and extract it. Then, go to your Chromium OS VirtualBox ‘Setttings’, select Storage, right click on your old Virtual Hard Drive and remove it. Then, click the + Icon to add a new Virtual Hard Drive. You’ll want to point to your newly downloaded and extracted image file.

Settings


Now that you’ve given Chrome OS a test drive, thanks to the open source Chromium OS project, will you be buying the #1 best selling laptop on Amazon.com or will you hold out a few months to see if these Chromebook Pixel or Chromebook Link rumors turn out to be true?


from Android Authority 

Cut the Rope Lantern Box celebrates Chinese New Year and adds gameplay element


Cut the Rope Lantern Box

Happy new year, folks! No, we’re not greeting you a month too late for 2013, but rather we’re welcoming the Year of the Water Snake, along with our friends in China, Chinese fans elsewhere, and those of us who likewise celebrate Chinese New Year (the start of which fell on February 10th this year). To commemorate the Spring Festival, the creators of Cut the Rope have released a new update, called Lantern Box, which brings new elements into the amazingly addictive (and sometimes frustrating) physics-based game.


Cut the Rope Lightning Box brings 25 new levels, which are centered around the Chinese New Year and the Lantern Festival, which is usually celebrated on the 15th day of the new year. This lunar year, the Lantern Festival will actually be celebrated on February 24th, so you still have time to practice your skills moving candy across lanterns on their way to candy-loving monster, Om Nom. The lanterns aren’t just there for show, as they actually act as teleporters, which act as the main gameplay element for this release.
Check out the intro video below.


Curious? Update your game now or head on to the source link for the Google Play Store page. The link is for the free version, but you can also get the premium, ad-free variant for $0.99.


from Android Authority 

5 de febrero de 2013

Anunciando: Realiza un Cambio by Zach Alcorn

Hace dos días se +Zach Alcorn y algunos escritores de +Google Plus Daily mas algunas excelentes personalidades en +Google+ han creado una campaña llamada Make a Switch o Realiza un cambio.


Esta campaña informa a los usuarios de como Facebook a estado tratando mal a sus propios usuarios y mostrarles como +Google+ es una mejor experiencia.

Esta pagina o campaña tiene sus puntos destacados que es indicar los beneficios y de igual manera educar a los usuarios acerca de las deficientes y malas practicas de Facebook. La pagina web despliega 5 sencillos pasos de como los usuarios pueden cambiarse a +Google+ e informar a otros de como y por que lo han hecho.

Necesitamos tu ayuda

Nosotros estamos preguntando a todos los usuarios en Google+ que le echen un vistazo y compartan la pagina www.maketheswitch.me y usar el hashtag #maketheswitch cuando hablen de esto y las razones por las cuales cambiaron a Facebook por Google+. Solo asegura te de invitar a tus amigos, familia y conocidos de cualquier red social en la que pertenezcan. Se han incluido fotos de perfiles e imagenes de banner. También puedes ingresar a la Comunidad de Make a Switch Community para ayudar a los nuevos usuarios de Google+.

El por que?

Por que quiero que usted y los demás Make the Switch. Por que en el tiempo que llevo en +Google+ veo que es una mejor experiencia para interactuar con la familia, amigos y conocidos y también desconocidos que son tus contactos en Google+. Este es un lugar donde puedo confiar mi identidad digital y también un lugar donde se puede conocer a emocionantes nuevas personas. Nosotros compartiremos mas razones dentro de estos 28 días (Empezó hace 2 días atrás) No te olvides de seguir el hashtag #maketheswitch para ver todo acerca de esta campaña

Estas listo para ayudar a otros usuarios a realizar el cambio?


1 de febrero de 2013

Nuevos estados de animo en Google+

En esta nueva actualización del App de +Google+ que se realizo dos días atras; aparte de las mejoras regulares que se reportó que fueron:
  • Casilla para agregar Links
  • La nueva ventana de notificaciones
  • Y la característica de poder controlar las comunidades desde el mobile Spp

También se agrego tres nuevos estados de animo o "Mood" que te permite compartir tu estado de animo en estas nuevas festividades o épocas que vienen.


La primera es la que esta por venir que es el Día del Amor y la Amistad.


La segunda es Saint Patrick's Day o el dia de San Patricio.


Y el tercero que es el inicio de la temporada de Spring


Entonces ya tienes mas estados de ánimos para compartir en estos días de fiesta o inicio de temporadas.